
After you've figured out what you're going to teach, the next step in creating an online course is outlining content. This is honestly my favorite part of the online course creation process. I love sitting down and planning out something new.
However, outlining can also be stress inducing. Looking at a totally blank page and trying to make a course come to life is not easy.

Here's the process I use to complete my course outlines:
Step 1. Identify Modules
Before you begin outlining your course, you should have a good sense of what the before and after looks like for one of your course students. When I start developing my outline, I begin by breaking apart that "transformation" into its component parts.
The first step in getting your outline down on paper is identifying the process that will get people from the “before” to the “after” in the transformation you developed.
At this stage, your focus should be high-level: what are the main building blocks of your course? You'll also want to start thinking about how to frame your content as a system, or how you can give it clear structure (systems and structure are key to eCourse sales!)
Courses tend to sell better when they are built around a strong structure. If you can create a unique program, formula, or process, it will go a long way towards helping you have a more successful course.
I like to use post-it notes for this process since they are easy to visualize and rearrange.
Step 2. Break Each Module Down into Core Steps
After I have my high-level modules in order, I basically repeat this same process for each module. Again, think about what the transformation factor is for this module, and identify the elements that are needed to get someone from before to after.
If you are using post-it notes, at this point your course looks like this:

Step 3. Brainstorm the Details
Once you figure out the core steps for your modules, you're ready to start diving into the details.
I typically brainstorm my courses by working through each section and using the following questions to help me stay focused:
What is the process you follow when you are doing the activity that you are teaching?
What are the key skills you use when you do the things that you're teaching?
What are the broad categories of facts and knowledge people need to know?
What are the essential principles for success in this topic?
What was your journey with this topic like?
The idea behind these questions is that they really get to the what, the how, and also the why of your content.
Making sure that these different types of information all make their way into your course is a great way to make sure that your learners feel confident with your training and that they are ready to implement what they've learned.
Step 4. Building Your Outline
As I am working through my brainstorm, I start building out my detailed outline. Creating this outline is time-consuming, but I do it for all the courses I create because it makes actually creating materials SO EASY.
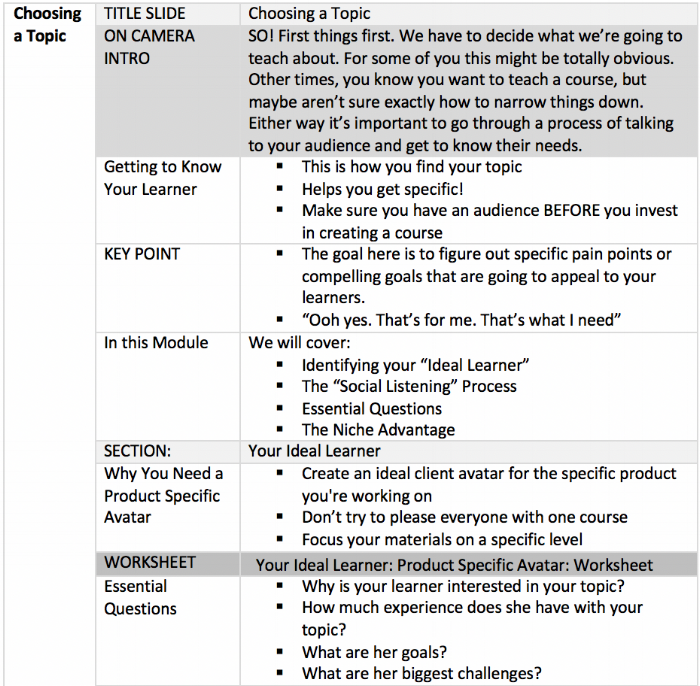
I like to create a list of what I think my slides are going to be for each module in one column in a table. Next to that, I list out some bullet points with what I think the important information is going to be.
Here's an example of what this looks like:
If you’re ready to start outlining, you can download this sample as a word doc here to help you get started
Step 4. Add Worksheets and Bonuses
When I'm working on this detailed outline, I also add what I want my worksheets to be along with any bonuses or supplemental material that go with the course.
After I have this detailed outline put together I'm ready to start storyboarding my slides. For this step, I create a super basic version of a slide deck without any fancy design elements or graphics just so I can get a sense of what my course is going to look like and how it's all going to flow together.
Step 5. Validate Your Outline
An optional step is to send your outline to someone you've worked with in the past or someone who could be a great potential buyer for this course. Having them review your outline will help you see you right from the start if you're missing any important information. Again this step is optional but it gives you some great extra information about what your audience is looking for in your course.
Have you created an online course? Or are you working on one now? What's the most challenging part of the process for you?

Meet Rachel
I’m an instructional designer providing eCourse solutions for creative entrepreneurs. My focus is on helping you learn how to talk to your audience and validate your programs to take the uncertainty out of launching.
Have questions about creating your online course? Click below to learn how we can work together!
